Whether you are a grill master or freshman flipper, the first step to ensure a quality grilling experience is a preparation. Reducing the time away from the grill during the cooking process ensures the taste you are grilling for. Digging through drawers looking for utensils with your back turned to the grill is a recipe for overcooked and charred food. So what do you need?
Pre-Grilling Checklist
Below is a list of ideas for you to choose from when prepping for the weekend.
- Do you have a cleaning brush? If you are grilling for a large gathering, having a cleaning brush handy is important as you swap out meats and vegetables to eliminate leftover grizzle buildup.
- Do you have a BBQ toolset with a long reach and quality grips? There is no need to singe your arms when you can have the reach and versatility you need from a quality BBQ toolset.
- Any plans for fried foods? Make sure you have a quality pot and strainer to easily fry and serve your fried menu items.
- Pants and shorts with back pockets are always a bonus. Rags are a grill masters best friend and the back pocket is a perfect place to stuff the rag during grilling. It ensures that the cloth is away from the flame and not sitting on the side tables next to the heat where a fire can start. One trick to keep track of the dirty end of the rag is to tie a knot in one end, which you will always stick in your pocket.
- Spices. Do you have the spices you need near the grill and easily accessible?
- Sauces. Are your sauces near the grill and easily accessible?
- Basting Brush. To ensure that you hit every square inch of your meat with your special sauce, a quality basting brush is a grill masters best friend for quick and easy application. Having multiple basting brushes allows you to clean later and not worry about crossing tastes by using the same basting brush for multiple sauces.
- Kabobs, Rib Racks and Accessories. There is nothing better than taking a new accessory for a spin during the grilling season. If you are looking for good ideas, think about Shish Kabobs, Rib Racks and other accessories that can make your guests happy with the results.
- Extra Propane or Charcoal. If you are grilling for a large crowd and can’t remember how many hours you have run on your current propane tank, it never hurts to have a backup handy. Same applies for charcoal. There is nothing worse than having to hop into the car and run to the store for more propane or charcoal leaving your guests and meats on the grill.
- Cooking/ Meat Thermometers. For the best cooking results, cook your meats according to a Cooking or Meat Thermometer. It is more exact and can be used in tandem with a traditional timer.
- Timer. When your backyard is filled with friends, it is easy to lose track of time. A cooking timer is a great way to monitor the status of your meats so you don’t forget when to check the progress of your meats with the thermometer.
- Plates & Platters. Some meats cook faster than others. So if you don’t have your platters ready, you will have to scramble when the time comes to move meats from the grill.
- Strategic Planning. If you are cooking for a large group and your warming rack is not big enough to stack all of your meats, plan out your cook times. Start with your longer cooking meats first and end with meats that require shorter cook times. And if your platters do not have lids, make sure you have a large roll of aluminum foil to keep everything hot.
- Lighting. If you are cooking at night, make sure you have a grill light along with a flashlight handy. Your grill light will help with reading the meat temperature and the flashlight is handy in case you drop something in the grass or on the deck and need to find it in low light conditions.
How to Use a Cooking or Meat Thermometer
To use a cooking or meat thermometer, insert it through the fat side of the meat, being careful not to touch bone. Bone conducts heat faster, and you’ll get a false reading of the meat’s temperature.
For best grilling results, cook steaks according to a Cooking or Meat Thermometer rather than a timetable.
- Rare – 125 degrees F
- Medium Rare – 130 degrees F
- Medium – 135 degrees F
Where to Insert – A meat thermometer must be inserted properly. The sensing area of thermometers is approximately 1 inch to 2 inches long and this area must be completely inserted in the thickness area of the meat.
- Poultry: Insert it in the inner thigh area near the breast of the bird, making sure to not touch bone.
- Red meat, roasts, steaks or chops: Insert in the center of the thickest part, away from bone, fat, and gristle.
- Ground meat and poultry: Place in the thickest area of meatloaf.
REMEMBER: Wash the thermometer stem thoroughly in hot, soapy water after each use.
Grilling with Charcoal
An important fact to remember is the heat generated from coals must be carefully watched. It is better to always keep the heat on low. However, the temperature can be increased to medium or high depending on the cooking requirements of individual foods. For example, fish cooks better at a low temperature, whereas chicken requires a slightly high temperature, and vegetables are cooked at a medium temperature.
The best thing about cooking with charcoal is that it cooks slower at a lower temperature. The meat you cook using charcoal is very tender. The idea is to let the meat cook well and carefully monitor the temperature.
Here are some cooking tips on using a charcoal grill that will help make your grilling experience more enjoyable.
- You should lightly oil the cooking grates with vegetable oil before starting cooking, so that food does not stick to the grates.
- You can use a chimney starter or electric starter to light the charcoal fire. Before you start cooking, make sure the briquettes turn to a white color.
- Close the lid, vent doors and chimney to extinguish the charcoal. When the charcoal has cooled down, transfer it into a metal container. You can immerse charcoal in water to extinguish if needed.
- Make sure to empty the accumulated ash in the bottom, after allowing it to cool down completely. Do this step after each use.
- Always store charcoal briquettes in a dry place. Moist briquettes are very difficult to burn.
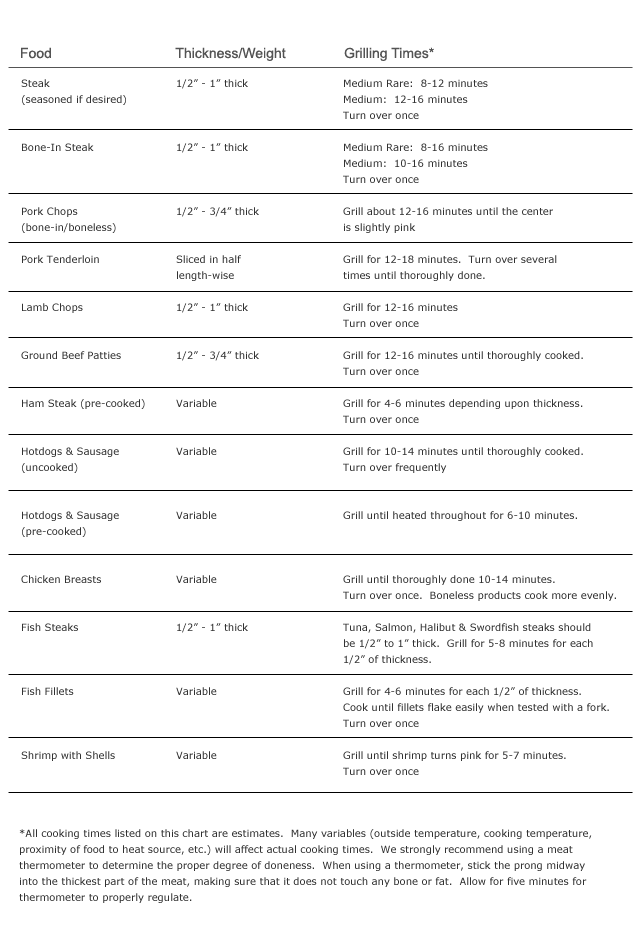
Reference the following Charcoal Cooking chart for grilling instructions:
Using your Rotisserie for Chicken
Roasting a whole chicken with a Rotisserie attachment on your gas grill is a way to cook the chicken evenly, giving it a golden color as it turns.
Here are steps that will help you with the rotisserie:
- Turn all the burners on high, close the lid, and allow the grill to heat as you prepare the chicken.
- While the grill heats up, clean the chicken and rinse the chicken completely, inside & outside, then pat dry with paper towels. Rubbing salts or spices on the inside of the cavity and lightly on the outside is optional. Truss the chicken with food-safe Cotton Butcher’s Twine to keep the wings and drumsticks from flopping around.
Note: The cooking grates need to be removed to use the rotisserie. For the grill that has a rotisserie burner attached to the firebox back panel, you can start rotisserie the chicken after placing the rotisserie rod in place without warming up the burner.
Using a Rib Rack or Shish Kabob Set
Grilling Beef Kabobs: Trim the fat from the steak and cut into 1- 1/2 inch cubes. Place the meat in a shallow container and marinate with red meat spices for 45-60 minutes. Alternate the meat and vegetables on skewers. Grill the kabobs over medium heat for 10-15 minutes or until the desired degree of doneness. While they are cooking, turn and baste the kabobs frequently with the reserved marinade.
Grilling your ribs with triple cooking capacity Smokeshop Rib Rack from Brinkmann: Before you cook, we suggest you lay the ribs out flat and then season them with spices on both sides. For a better flavor, marinate your ribs for 30-60 minutes. The thick side of the rib should be placed up, so they will self-moisten during cooking. You want to cook the ribs slowly on low heat, or using two burners instead of four burners. Turn off two center burners, then place the rib rack on the center of the cooking grates between the two outer burners. Your ribs should be done in approximately 45 minutes.
Note: You can put other cuts of meat in the rib rack. Chicken or pork chops can go in the rack. Cooking times vary.
Cleaning Up
Keeping your Cooking Surface Clean
As soon as you remove your food from the grill, turn the grill on high for about 5-10 minutes and brush the grids with a grill brush until all major solids have come loose. If you have porcelain coated cooking grids, make sure that you only use a brass bristle brush. Do not scrape porcelain coated grids with the scraper that is usually attached to most brushes, it may cause damage to the coating.
How to Clean a Gas Grill Burner
The flame from your grill burner should always appear blue at the bottom and have a yellow tip. If the flame coming from your grill burners is red or orange, you may want to consider cleaning or replacing your burners. Also, check the burner ports for dirt and debris.
Remove the Cooking Grates, Heat Tent and Lava Rocks from the grill to expose the burners. Note that you can also take this opportunity to clean the grill grates with wire brush. Next, you may have to use a cleaning solution to break down and loosen the grease and grime on your burners.
Remember, the more often you clean your grill, the less difficult it will be each time. If you need a replacement burner or replacement parts, please visit the My Grill section to find your grill parts easily.
How to Clean the Inside of a Gas Grill
Unfortunately, it doesn’t take long for the inside of a grill to build up with grease, if you don’t want the grease and crumbs to get out of control; you need to clean your grill properly and often. Here are helpful steps to clean inside your grill.
Remove cooking grates, and then use a soft brass wire brush to remove any loose debris from the inside of the lid and the firebox sides. Brush cooking grates using a wire brush to remove residual ash, any debris off of the burners, all debris from inside the grill into the drip pan. It is important to keep the drip pan clean because accumulated grease can cause flare-up. The grease pan can be scraped out with a putty knife or scraper and rinse off with warm water.
Cleaning Stainless Steel Grills
You need to remember the grill will scratch easily when it comes to cleaning stainless steel. Never use steel wool or metal brushes and avoid using abrasive cleaning agents to clean your grill. For the best results use a stainless steel cleaner and a soft sponge.
Keep Your Grill Covered Year Round
The first thing you need to do to keep your grill looking new is to take care of it. This means you need a good quality grill cover. The cover comes off right before you turn on the grill and it goes back on as soon as it is cooled and the surfaces side table and lid cleaned off. This will keep the elements off your grill and keep it looking good.
If you need a grill cover for your Brinkmann grill, visit the My Grill section, find your grill and click on the Accessories tab.