Seasoning a New Grill or Smoker
You surely have asked or thought – how to season an offset smoker? Is it even necessary? This is an important process that should be completed before you make use of your new smoker for the first time. There are diverse ways on how to season a smoker and they will generally differ depending on the brand of smoker you purchase.
Seasoning a Smoker for the First Time
During the production and shipping process of smokers, there are usually units of debris left inside the new smoker. This is normal and happens with many types of products, not just barbecuing smokers. The residue will usually take the form of dust, oils, grease, metal shavings, cardboard, and wood splinters. Your new smoker will likely have a light coating of oil on the inside. The manufacturer coats the inner walls of the smoker to stop it from rusting. Seasoning removes all of this debris, destroys contaminants, clears the pores, and bakes on the paint of a new smoker. In theory, seasoning or curing a smoker will make it ready for use and must be done once you have finished constructing it.
How to Season a Smoker: Instructions & Tips
Seasoning a smoker is essential to help burn away any contaminants that might have been left by the manufacturing process. This process will prevent pollutants in the smoker from spoiling the taste or smell of the food.
If the smoker is not seasoned, it will not only ruin your food taste, but there may be solvents or glue residue that can be dangerous to human health if consumed.
There are different ways to season a smoker, depending on the type of smoker you purchase. There will be a brief description of the instruction booklet to tell you precisely what you can and can’t do with your smoker.
Steps and Instructions for Seasoning Your Smoker
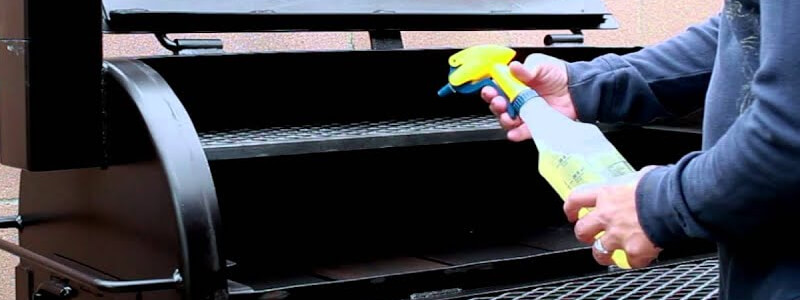
The first step is, to begin with, to clean the smoker with some soapy water and a washcloth. Give the inside of the smoker a quick wash down to remove any oil on the inside. Be careful not to scratch the surface. Once you’ve finished that, please allow it to air dry.
Once it has dried, get a can of olive, vegetable oil, or some cooking oil and put it inside a spray can. Wholly but lightly cover the inside walls of the smoker with oil. You don’t need to, but we suggest covering the cooking grates and any racks or accessories that came with the smoker or grill. There is no need to cover the water pan if you have one. Take the pan out when you heat the smoker in a subsequent step.
If you’re using an electric smoker, don’t let the oil spill or spray on the electric heating element. Likewise, if you have a gas smoker, don’t get any oil on the burner. We suggest that you use plenty of oil, but not enough that it begins to drip and run down the walls. Let the smoker rest for a while so that the oil settles before moving on to the next step.
This step aims to heat the smoker to burn off anything left by the manufacturing process. There are various recommended temperatures and times for this. A general rule of thumb is to slowly bring up the heat to your smoker’s maximum temperature rating and maintain that temperature for a couple of hours. This part of the process is just to simulate smoking. It’s not ready for food yet, so don’t put anything inside it except the oil.
Season Charcoal Smokers
For charcoal smokers, get a chimney starter and use it to get the coals super hot, fill the pan to the max and mix in some wood chips. There is no need for the water pan, so remove it before you fire it up. Open the vents wide to get maximum heat flowing through and at the high temperature you can get. Let it burn for at least an hour, or ideally until the coals burn out. Check the instruction manuals also for precise details on how to season a charcoal smoker.
After the hour or so, open the smoker and allow the coals to burn out, and cool everything off.
Your smoker is now ready to use. Now go smoke some of the best BBQ you’ve ever tasted.