Answers to all your questions about Smoking Meat
Answers to your questions about smoking of all kinds. Find out about all the variations of smoke and smoking to make true low and slow barbecue. From brisket to fish to anything else that benefits from smoke cooking.
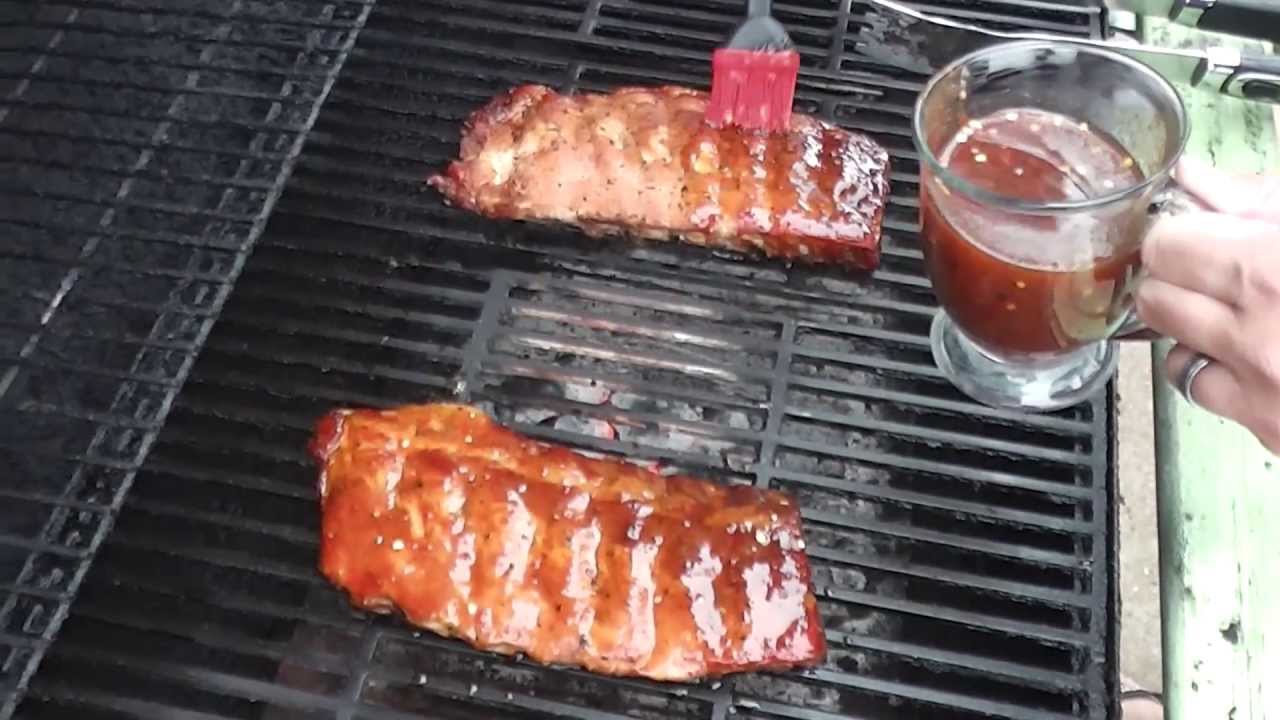
When should I apply barbecue sauce?
It’s a common misconception that you shouldn’t add barbecue sauce to foods while they’re cooking. This is simply not true if you smoke. To burn barbecue sauce, it takes more than the temperature of a smoker, so don’t avoid it for that reason. There are several other compelling reasons to avoid adding barbecue sauce too early.
The majority of what we call barbecue sauce contains sugars. Sugars burn at about 265 degrees Fahrenheit. If you cook above this temperature, the sugars in a sauce will burn and impart a bad flavor to the food. You don’t have to worry about adding barbecue sauces to meats during their smoking times because smoking is typically done at much lower temperatures. You may notice some caramelization of the sugar, but it will not burn and will not cause any serious problems.
The flavors you add to smoked meats, on the other hand, should be kept under control. The majority of authentic barbecue is served with barbecue sauce as a condiment rather than as an ingredient. Make the most of your barbecue by allowing diners to add sauce as much or as little as they want. This does not, of course, apply to mops, sops, marinades, and rubs used to flavor barbecue as it cooks. Thick barbecue sauces should be saved for later for flavor, not because they will burn on the meat.
Does bark affect the flavor of smoked foods?
That’s a question that no one has answered yet, so you’ll have to try it for yourself and see what you think.
There is no agreement on whether bark affects smoked foods. Some claim that bark imparts a bitter flavor, while others claim that it has no effect on the flavor. I try to keep the amount of bark on the wood I smoke to a minimum, but I don’t go all out and carve off every last bit. Remove any loose pieces of bark from the wood and, of course, make sure it’s split and the right size for your smoker. If you buy wood chunks, you won’t have to worry about anything.
Because different woods have different barks, always go with what works best for you. Barbecue is more an art form than a science.
What’s the difference between wood chips and wood chunks?
The size of the wood pieces you use to make smoke is determined by the type of smoking you do and the equipment you use.
If you’re not cooking with whole logs of hard wood, the only way to get a true smoke flavor in your smoker is to add wood to the fire. You can add wood to an electric, gas, or charcoal smoker to get the authentic barbecue flavor. Fortunately, prepackaged wood chips and chunks are available for your convenience. But which one should you choose?
Chips are small pieces of wood that are ideal for producing short bursts of smoke. Chips, even when soaked in water, burn quickly, emit smoke, and then vanish. If you are not going to smoke for an extended period of time or if you only want a small amount of smoke flavor, go with chips. Also, make certain that you have read the manufacturer’s instructions for your smoker. Some electric and gas smokers are only designed to use wood chips.
Chunks are large pieces of hardwood on the other side. These pieces, which are typically less than 2 inches in length, are ideal for producing smoke over a longer period of time. It’s best to use chunks if you’re going to be smoking for a long time. You’ll get more smoke over a longer period of time without having to run out and refill every 30 minutes.
Whether you’re using chips or chunks, you don’t want them to burn too quickly. This produces intense bursts of smoke, which can turn food bitter. You can slow down the combustion and lengthen the time it takes to produce smoke by soaking wood in water for about 15 minutes for chips and 30 minutes for chunks. Allow the wood to drip dry for a few minutes before adding it to the fire. The wood should be moist but not dripping wet.
What’s a mustard rub?
What’s the point of applying a dry rub if it just falls off as you’re loading the meat into the smoker? Here’s a tip to keep that rub where it belongs.
Someone long ago discovered that if mustard is left in a smoker for an extended period of time, it loses most of its flavor. However, mustard is a sticky substance that is ideal for keeping dry seasonings on meat. As a result, the method of mustard rubbing meat was developed. There are several approaches you can take, but the basic concept remains the same. A thin layer of mustard on the surface of the meat will keep the dry rubs in place while it is smoked. This is particularly true of ribs.
To begin the mustard trick, prepare the smoked meat by patting it dry with paper towels and then coating it in a thin layer of mustard. The best part is that you don’t have to use expensive mustard. Yellow mustard, which is inexpensive and easily prepared, works well. You can now apply your rub to the surface of the mustard. The mustard will become encrusted with the dry rub. All you have to do is be gentle with the mustard coating to avoid wiping it away. Wrap the prepared meat in plastic wrap and set it aside for the night. The vinegar in the mustard actually picks up the flavors from the rub and transports them into the meat. Smoke the meat as usual from this point forward.
The flavor of the mustard will have almost completely disappeared by the time the meat is completely smoked and ready to serve. The mustard actually works to tenderize the meat, and you’ll only notice a thin crust on top.
Another method for making the mustard rub is to simply combine your dry rub with enough mustard to coat the meat. In effect, the results are the same as with the more traditional method described above.
What meats are best for smoking?
Tough, blemished cuts of meat are ideal for smoking. After all, it was with pieces of meat that no one else wanted that barbecue got its start.
Smoking is a low and slow cooking method that uses smoke to flavor and tenderize meats. Smoking usually lasts more than 30 minutes per pound, but it can last much longer. After cooking for this long, many good, lean cuts of meat would dry out and become unpalatable. However, many really bad cuts of meat that are high in fat and connective tissues (Collagen) turn out tender, flavorful, and downright delicious. Barbecue is built on cheap, inferior cuts of meat. Barbecue meats are typically beef brisket, pork shoulder, and ribs.
These meats are tough, chewy, and generally of poor quality, making them unsuitable for cooking. Barbecue takes advantage of the high fat and connective tissue content of these meats to enhance their flavor. The fat melts and the connective tissue breaks down during the long, slow cooking times of smoking. This sweetens the meat while keeping it moist during the smoking process. Good cuts of meat, such as pork tenderloin, steaks, or lean roasts, do not benefit from this method of cooking and should be prepared differently.
If you’re new to smoking, I recommend starting with a small pork shoulder roast, such as a Boston Butt, or a picnic. Ask your butcher; he’ll understand what you’re on about. These cuts are generally forgiving and reasonably priced. As you gain experience, you’ll be able to progress to larger and more difficult cuts, and before you know it, you’ll have mastered the art of true barbecue.
Why do I get a bitter flavor on smoked meats?
The secret to great barbecue is a combination of heat, time, and smoke. Airflow is the key to great barbecue and successful smoking. You need to introduce smoke into the meat, but you can’t keep it there for too long. Creosote is formed when smoke becomes too heavy or stays for too long. Creosote is a thick, oily substance that remains after a fire. It not only makes foods bitter, but it also numbs the tongue when consumed. If you’ve ever left a plate of barbecue with a numb tongue, it’s due to creosote buildup on the meat. To get rid of creosote, start with a clean smoker. A dirty, crusted smoker will aid in the production of creosote. Then you must ensure that there is adequate airflow. If you have a small water smoker, there isn’t much you can do to keep smoke in or control how much escapes. If your smoker has a vent, make sure that enough smoke is getting out to keep it from accumulating.
Holding a glass of ice water in the stream of smoke coming out of your smoker is one way to test for creosote. If after a minute or so, you notice black specks on the glass, you don’t have enough ventilation. Increase the opening of the vents to allow more air to pass through the smoker. If you have a vertical water smoker with no vents, take the lid off for a minute to allow the smoke to escape. When you notice creosote, it’s time to stop adding wood to the fire. Reduce the amount of smoke produced, at least temporarily. At this point, you may want to wrap the meat in foil and allow it to finish cooking without being exposed to additional smoke.
Tasting the meat is another way to test for creosote. Put a piece of the darkest meat on the surface in your mouth. Allow it to sit on the tongue for a few moments. Does it have a bitter taste? Is your tongue a little numb? The numbness is usually felt before the bitterness is tasted.
The surface of smoked meats is ruined once the chemical reaction occurs. The only hope you have is to carve off the blackened edges and eat the meat’s interior. This is nearly impossible with ribs, but it is possible with brisket and pork roasts.
I got a vertical water smoker without instructions. How do I use it?
When you take your typical vertical water smoker out of the box, it may resemble a puzzle. So, how does this all fit together?
Let me walk you through the fundamentals of using your vertical water smoker. First, disassemble the smoker and place the base (which is short and round and has feet) where you want to smoke. Fill the metal charcoal pan with 6-10 pounds of charcoal and place it inside the base. The longer the heat lasts, the more charcoal you use. Light the charcoal and leave it to burn uncovered until the coals are almost entirely white and the fire is very hot. While the coals are heating up, heat enough water to fill the enamel water pan halfway. You want the water to be hot so that the hot coals don’t have to heat it for you. Fill the water pan in the barrel (the tallest part of the smoker) with hot water and hang it on the bottom hooks. Carefully place the barrel on the charcoal pan section. Replace the wire racks in the barrel section, one on top of the water pan and one on top of the hooks. You are now ready to smoke something.
You can get to the fire by opening the door and adding wood chunks to make smoke. One of these smokers’ flaws is that the bottom rack (half of the cooking area) is unsuitable for smoking. Because the smoke is only held in the lid section, only the top portion of the smoker functions properly. However, in general, it is large enough to smoke an entire brisket. Replace the lid and let it go once the food is on the top rack of the smoker. I recommend using an oven thermometer to check the temperature. Place it near the food in the smoker. Check it on a regular basis. Remember that every time you lift the lid, you let out a lot of the smoke and heat, so try to leave it alone as much as possible.
After about 2 to 3 hours, the coals in the coal pan will become caked with ashes, and the airflow will simply cease. As a result, the temperature drops and the smoking process comes to a halt. Several people have attempted to modify the smoker design in order to eliminate this problem, but I have yet to see an effective solution. To return to a good smoking environment, you must remove the ash from the pan.
This is where things can get a little tricky, but I came up with a solution I call the sift, which is a little risky, so proceed with caution. To clear the ashes from the pan, remove the smoker’s barrel section to expose the coal pan. Begin by standing upwind of the coal pan and lifting the coal pan out of the base with some very thick grill gloves. These pans are generally made of aluminum and do not get too hot, but you must still exercise extreme caution. Most of the ash will fall through the vent slits in the bottom if the pan is carefully shaken back and forth. You can also use something to stir up the coals, allowing some of the ash to fall through.
Once the ash has been cleared out of the coal pan and into the base unit, dump the ash out of the base and replace the coal pan. The ash will contain hot sparks and must be stored in a location where it will not start a fire. You can now add more coals to the pan. The coals you add to the pan must be hot and ready to go. A charcoal chimney works well in this situation. With the fire restored, you can replace the barrel section and resume smoking.
I want to emphasize how dangerous this procedure is. Wear eye protection and don’t do it in shorts. Fine ash is murder on the eyes, and hot coals are simply murder. If you choose to use this trick, make sure you do so away from anything flammable and with quick and easy access to water.
A few more pointers
Don’t rely on the thermometer built into the lid. I’ve used a few of these smokers, and they all read differently at the same temperature. You want to get to a temperature of around 200 degrees. Because it is more accurate, I use an oven thermometer. Throw some wet wood chips on the fire if the temperature rises too high. This will cause the temperature to drop slightly and some smoke to form. If the temperature falls too low, open the small door on the front of the smoker to allow more air to enter and help build the fire. Starting small and working your way up as you gain experience and get to know your smoker is my recommendation.